Graveyard Keeper 2 Layout Guide — Yard Zones & Factory Lines
Plan a Graveyard Keeper 2 layout that works: zone same-area storage, respect the two-build grave limits, power the factory, then route belts tile by tile.
FAQ
How should I start planning a Graveyard Keeper 2 layout?
Does Graveyard Keeper 2 limit how many grave areas I can build?
What powers the underground factory?
Which way do conveyor belts move items?
Can a factory layout automate everything?
Quick answer
A working Graveyard Keeper 2 layout is really two layouts. In the yard, materials are pulled from containers in the same area, so the winning move is to zone your storage: put each crafting station beside the pile it eats, and let one Firewood shed turn Firewood into Fuel for that entire zone. Underground, the layout questions are power, direction and handoffs: repair a powered bay, staff a Zombie Carousel, then run belts from the labelled resource providers into a chest beside each machine.
The factory plan below follows Sinxi’s kit-layout walkthrough, which builds every tier 1 and tier 2 restoration kit by placing the resource row first and the stations second. Numbers that come from community research rather than the game’s own documentation are labelled as such in the text.

Optimized factory layout for all tier 1 and 2 restoration kits
The two walkthroughs used for this page were published after the 22 September 2026 release, so the Factory power figures and station readouts visible in the screenshots reflect the shipping build. Bench costs and unlock details come from this site’s community research notes for patch 1.007, which are data-mined rather than officially confirmed, and the live build in your own save always wins.
Think in zones, not in one big base
One rule shapes almost every layout decision in this game. A queued recipe pulls materials in a fixed order: the crafter’s backpack, then the station, then the keeper’s backpack when you are standing there, and finally every container in the same area — boxes, stockpiles, the well, the Firewood shed, Flask shelf, Scroll Cabinet and Study Table. Nothing is pulled across an area boundary.
That single constraint decides where things go. A station is only as fast as the pile beside it, so the efficient layout is a set of small zones, each with its own storage cluster, instead of one giant warehouse next to one workshop. The automation guide covers the factory mechanics in more depth once the zones exist.
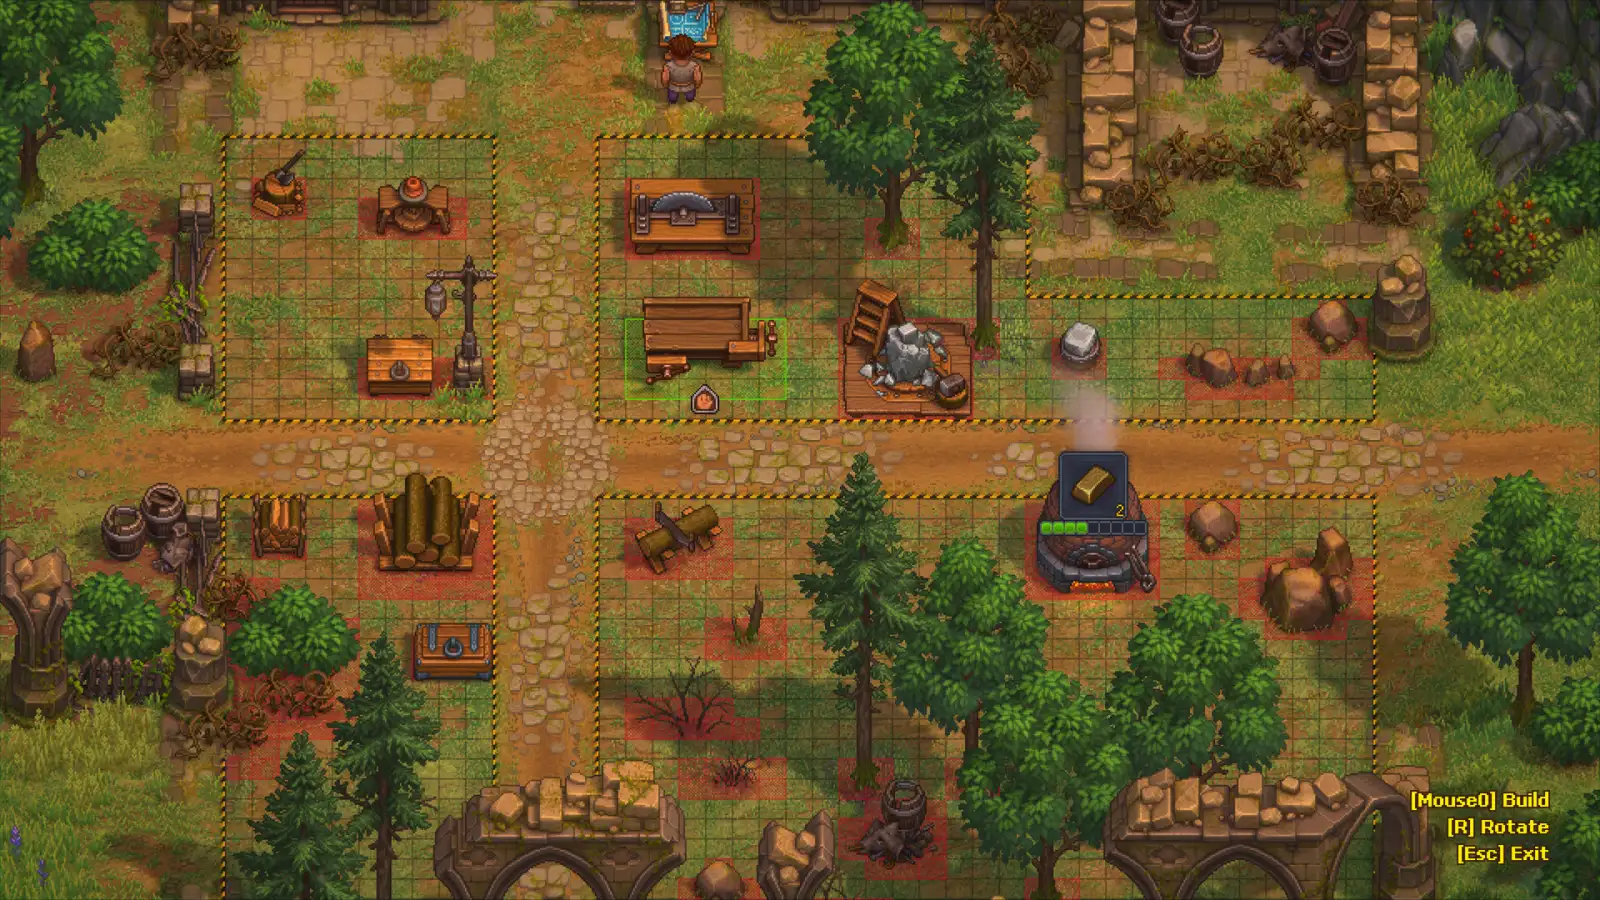
Build mode draws zones in yellow and blocked or occupied ground in red, which is the fastest way to check whether a new station still fits the pocket you planned.
Build each zone around one storage cluster
Because the pull is area-wide, the storage and the stations that use it belong in the same pocket. Keep the wood chain (Sawhorse, Chopping Spot, Woodworking Workbench) in one corner with its logs and boards, and keep the stone chain beside its stone pile. The payoff is that you stop carrying intermediates between buildings.
Fuel is the clearest example. A Firewood shed supplies Fuel to every station in the same area, converting 2 Firewood into 20 Fuel, so one shed covers a whole workshop pocket instead of one furnace. A zone that burns Fuel should therefore own its shed rather than depending on a pile somewhere else.
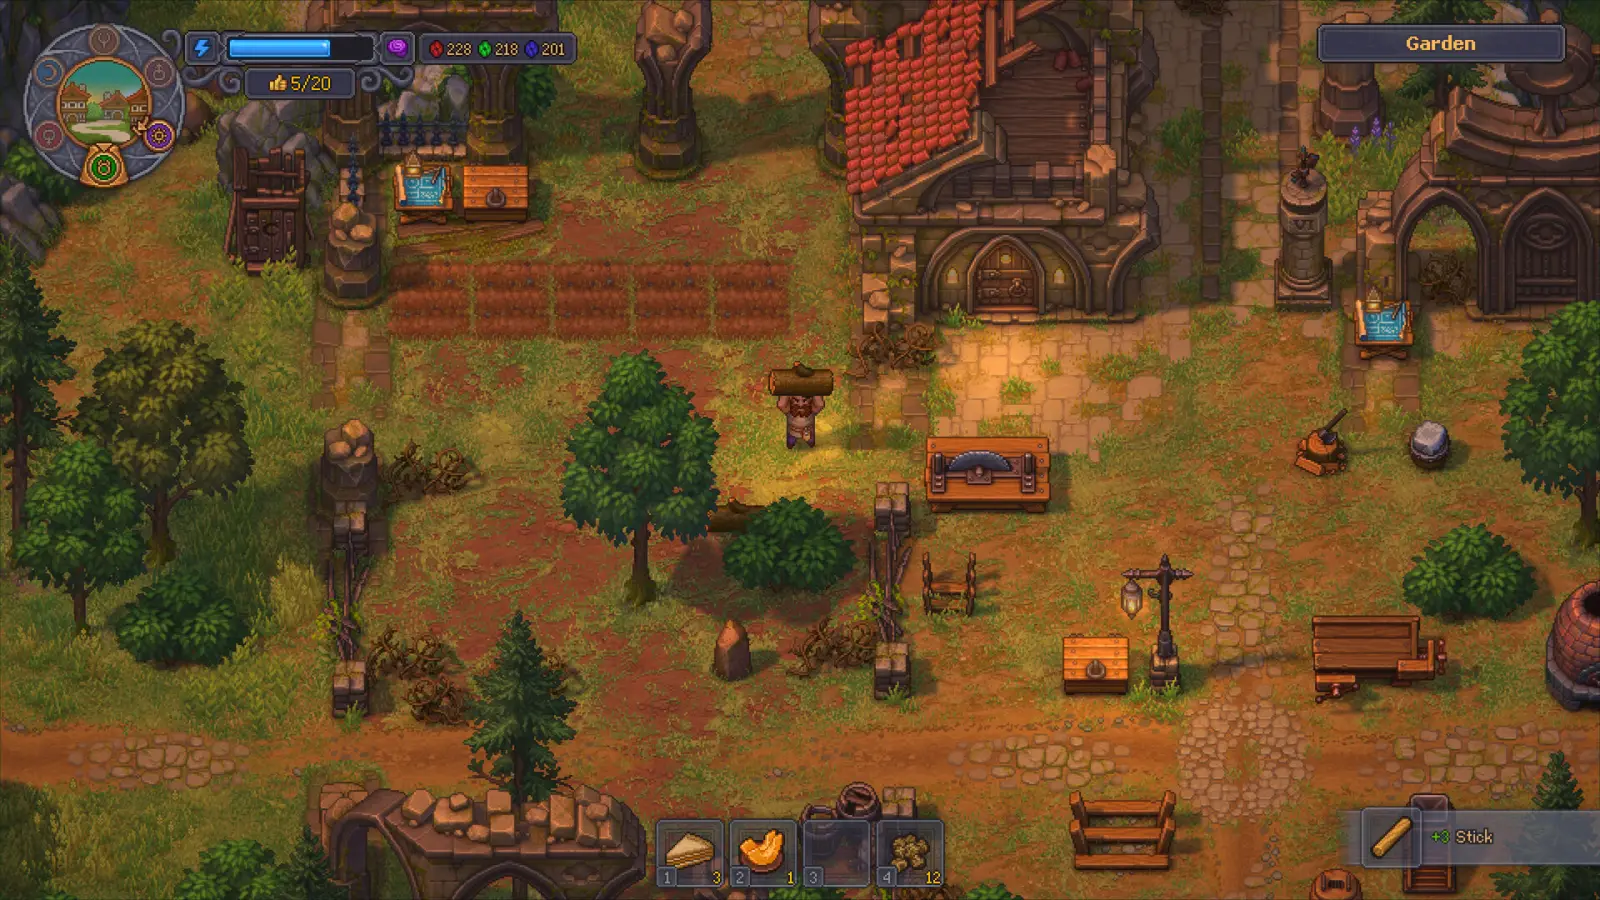
The official Garden screenshot shows the intended shape: beds, workstations and chests sharing one plot so the pull always finds the nearest container.
Respect the grave-area build limits
The cemetery is a separate layout problem from the workshop, and it has a hard ceiling. The site’s research record states that the same Grave Area, Walkway, Columbarium and Mixed Area can each be built at most twice. The limit is per area type, not per plot, so decide the cemetery grid before you spend materials on decorative variants, and treat the second copy of an area as the last one.
There is no verified way around that limit in the current patch, so plan the burial side with the two-build rule in mind rather than discovering it halfway through decorating.
Power the factory bay before you lay belts
Break through the wall beside the scriptorium to reach the underground workshop. Some rooms have spinning gears — those are the powered bays. A Zombie Carousel must be repaired before it runs: put a zombie on it and it produces factory power, and several carousels stack for more. The site’s research records 7 factory power from a standard carousel and 10 with the Belt Master perk, which is a single-source community figure.
The carousel dial itself confirms the number: in the second walkthrough it reads 7 with the Factory counter at 0/7, and the Factory build board prints a Factory power counter at the top. In the kit walkthrough that counter reads 39 while the line is still half built, so keep an eye on it before adding more machines to a bay.
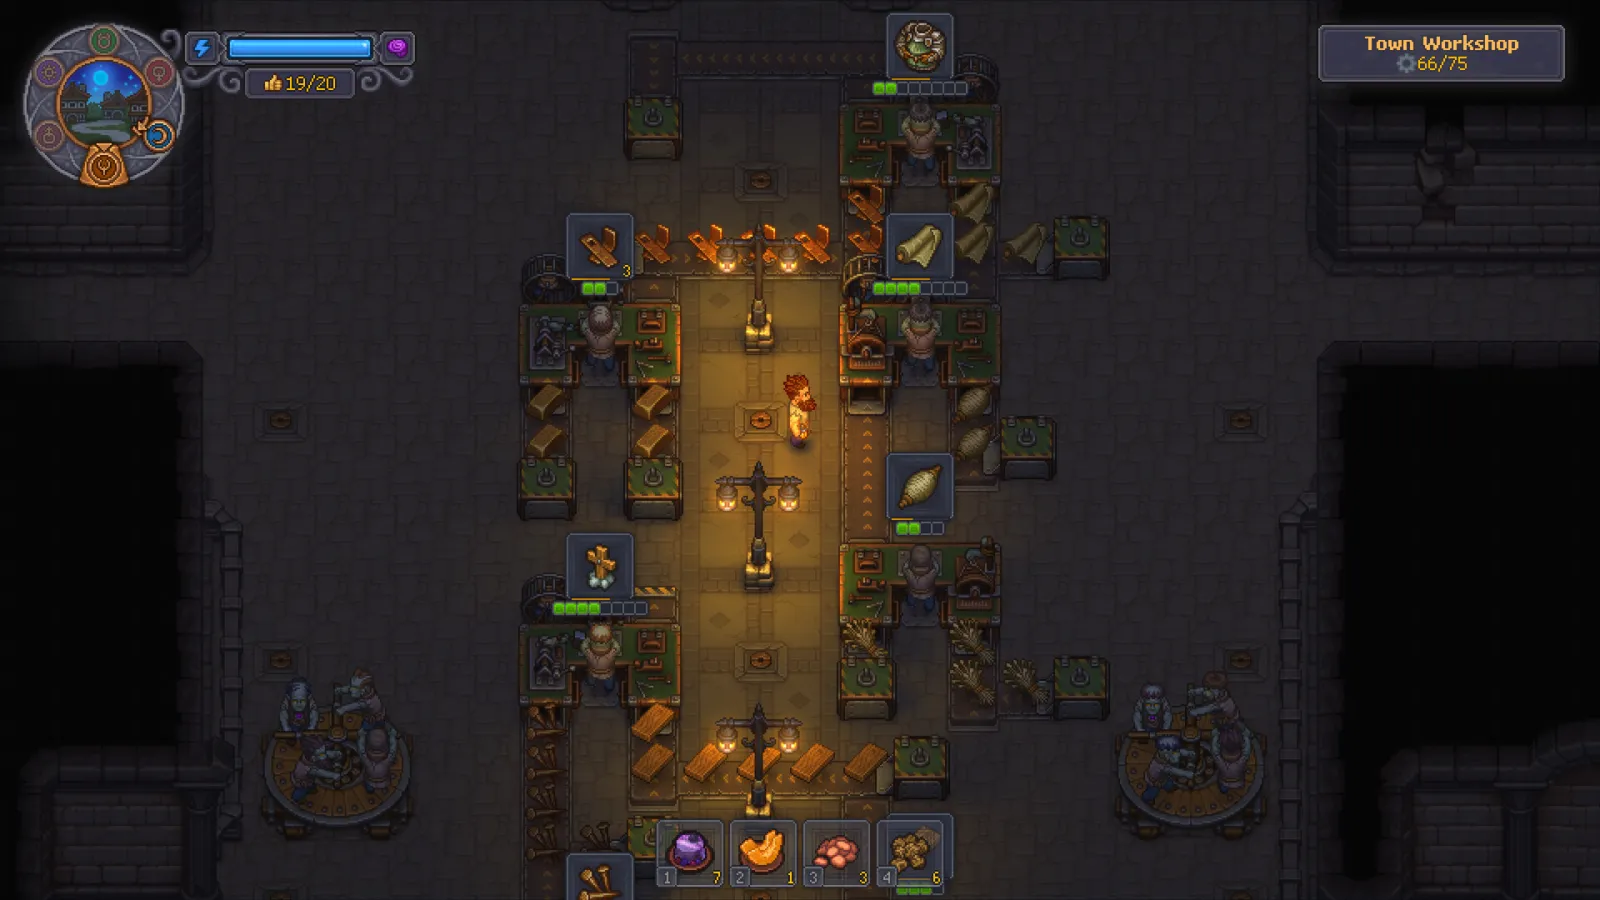
The official Town Workshop screenshot is a finished version of the shape you are planning: belts down the middle and power furniture in the corners, with the Factory counter in the top-right.
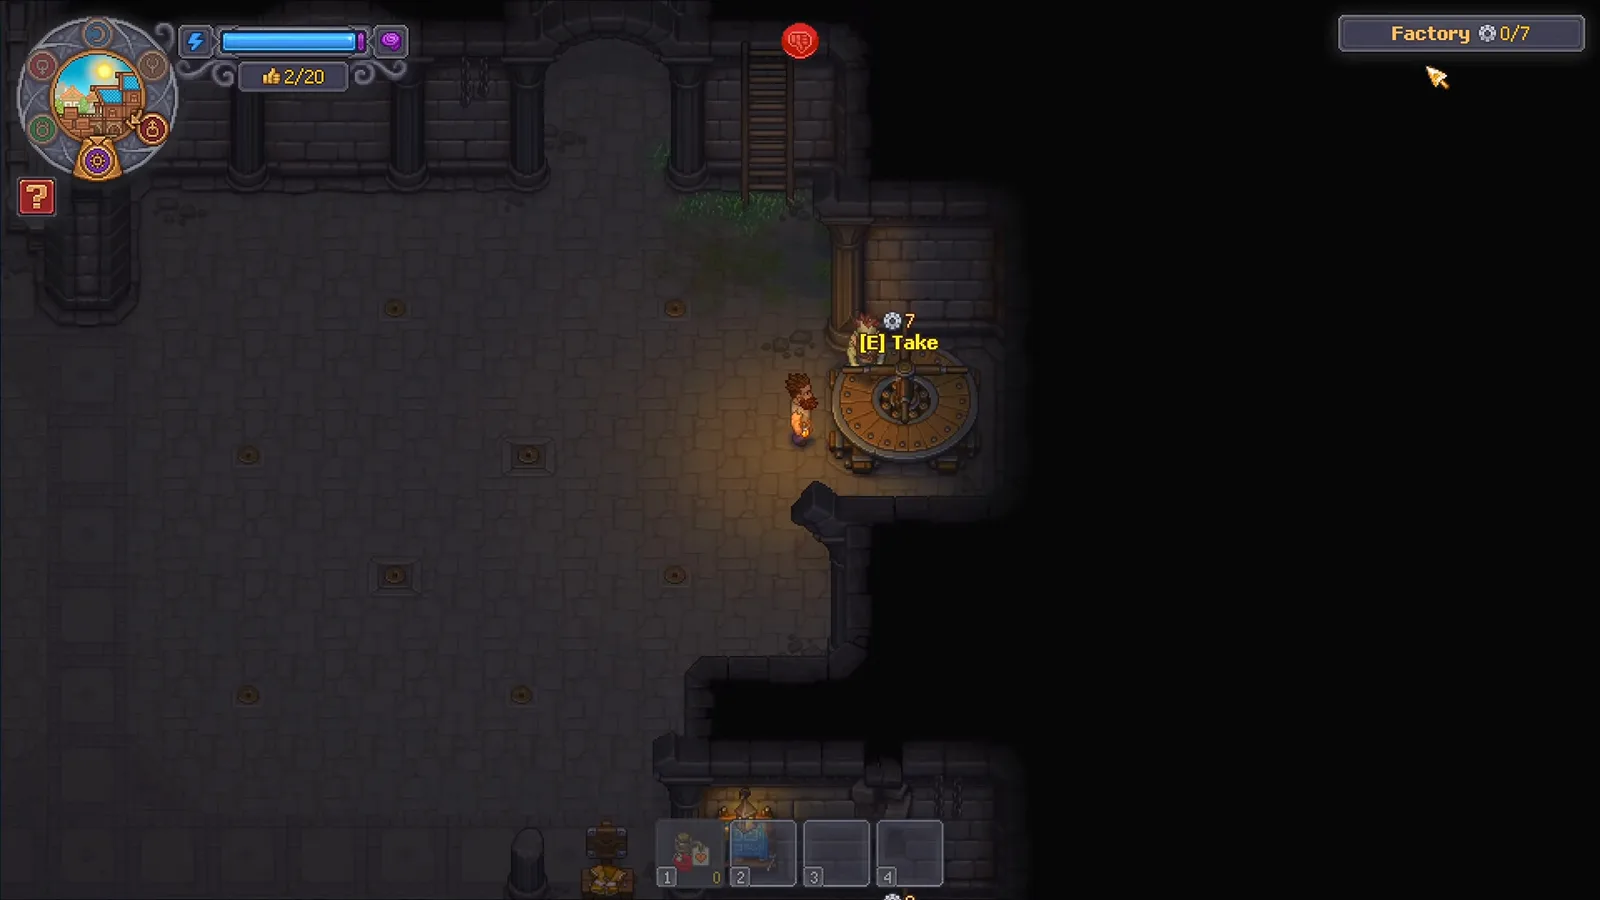
One staffed carousel is enough to start: the dial shows 7 power and the Factory counter shows how much of it the current layout uses. Source frame: Ic0n Gaming at 3:38.
If a machine shows a gear icon instead of a progress arrow, the bay is out of power rather than out of materials. Assign more workers through the how to make zombies guide before you expand the belt network.
Route the resource warehouses into the line
The resource providers are the labelled shelves along the factory wall, one per material, and each has an exit for conveyor belts. You can also fill them from the floor above, which keeps the underground floor free for the line itself. In the kit walkthrough the whole resource row is a repeated pattern: a provider exit, a chest to buffer it, and then a short belt run onward.
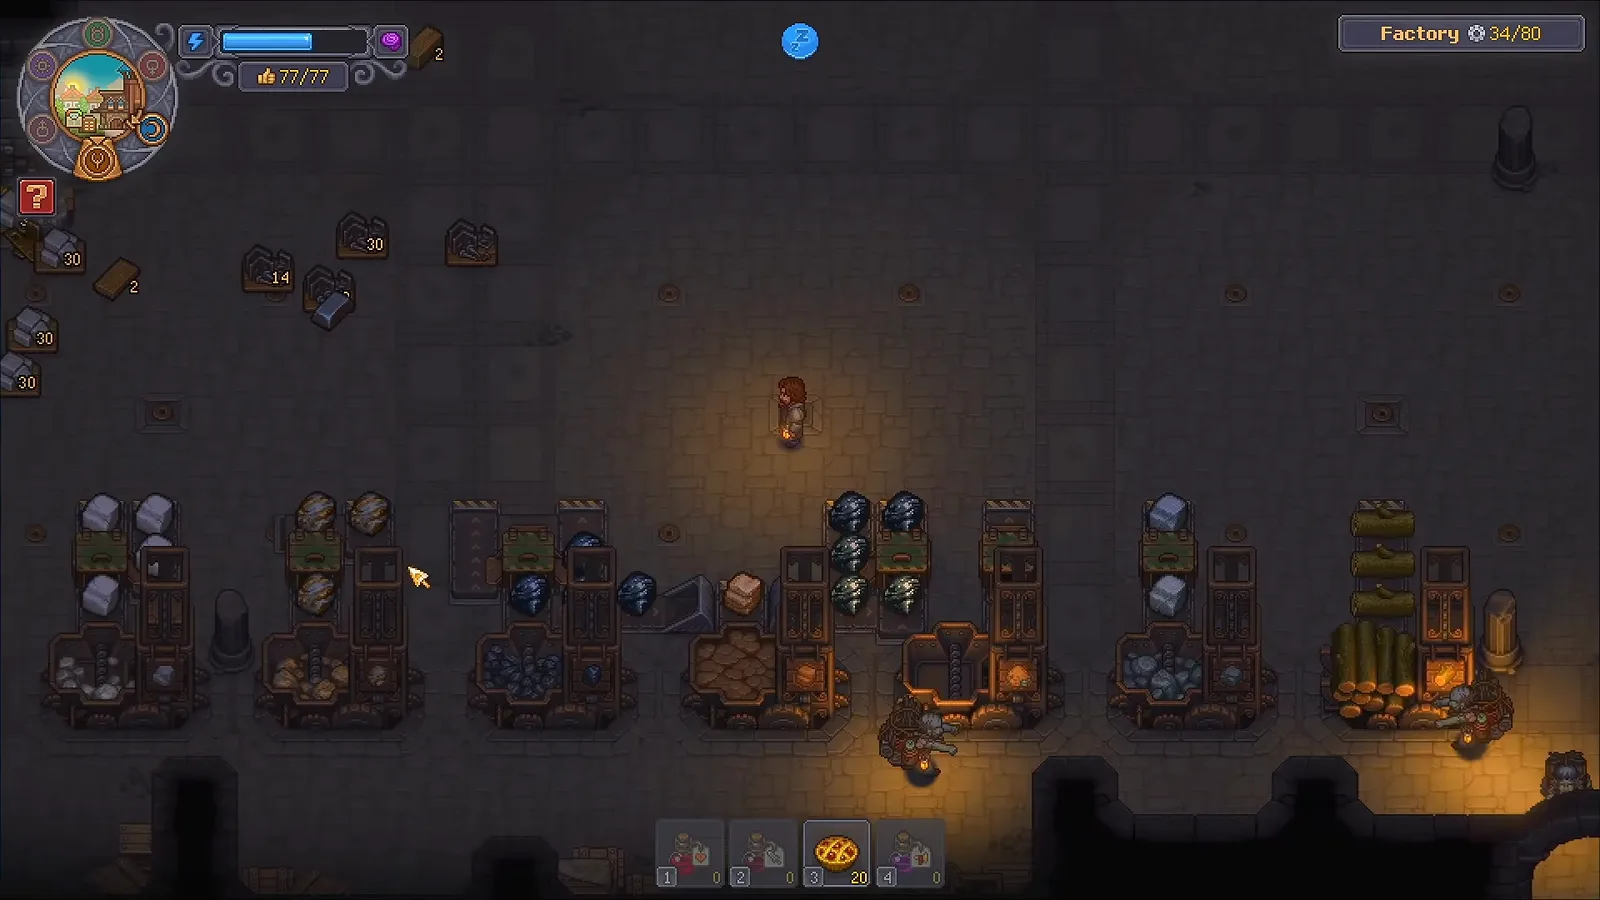
Every provider gets the same treatment before a single machine is placed: exit, chest, belt onward. Source frame: Sinxi at 0:18.
Sinxi’s build order is the part worth copying. He places the chests and conveyor belts on all of the resource providers first, then puts the machines on top of the finished routes. Some materials need slightly different plumbing — sand is fed from the right of its green area with a rightwards-facing belt, coal uses a four-tile underground run, and iron and marble simply go up, into a chest, and up again.
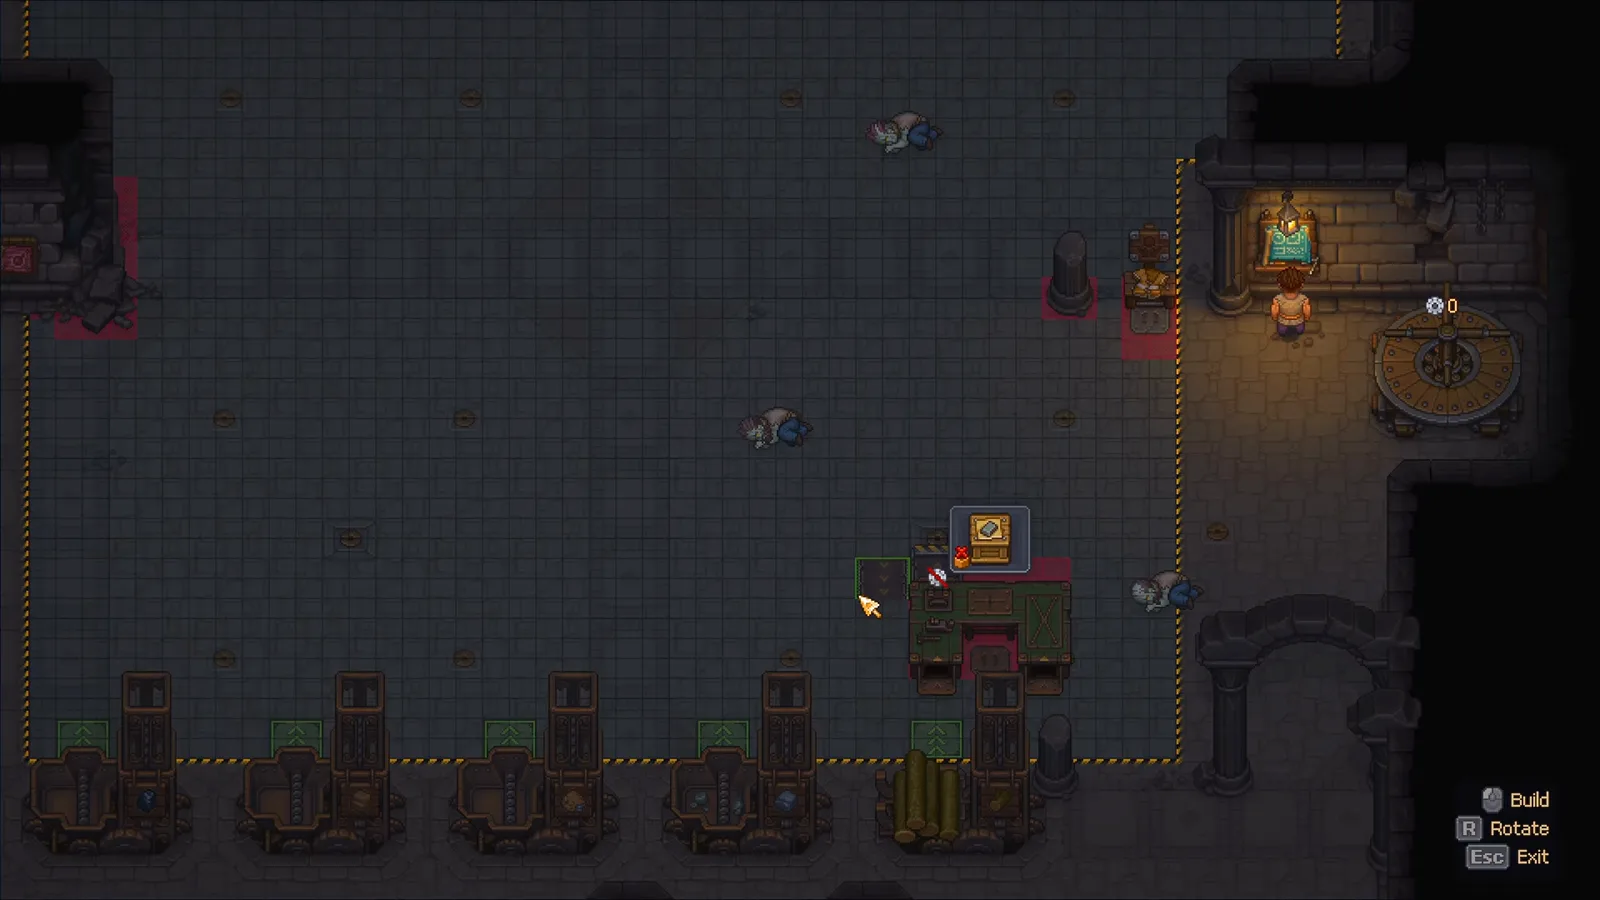
In build mode the small green arrows mark where a provider or warehouse pushes items out, so you can trace the route before spending belt materials. Source frame: Ic0n Gaming at 7:08.
Lay the belts tile by tile
Conveyor belts are placed in build mode, where the mouse places and rotates each tile and the bottom-right corner lists Build, Rotate and Exit. Yellow arrows on the belt show the direction of travel, and a machine pulls items off a belt that reaches it. Sinxi notes that the last tile therefore does not have to face the machine, and offers a straight-output alternative for awkward corners: send the output upward, then right, then up again, or use two splitters.
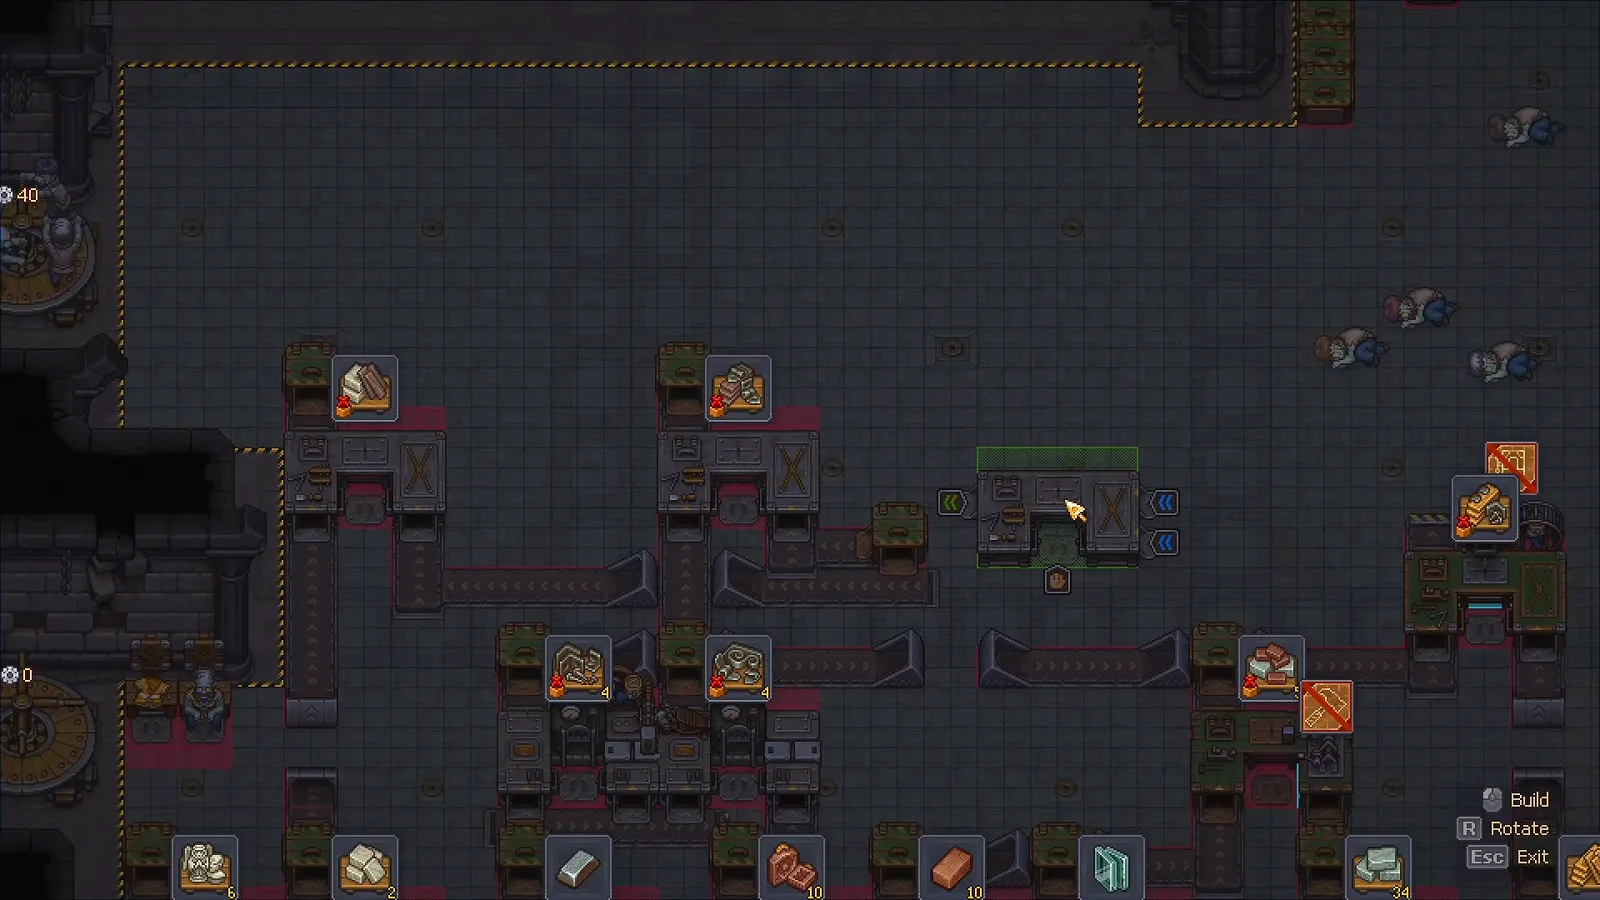
Read the chevrons before you leave build mode — a belt that looks connected but points away from the station will leave the queue idle. Source frame: Sinxi at 9:46.
Short runs also keep the layout debuggable. The walkthrough mixes surface belts with underground belts to cross open floor without cluttering it, then puts a conveyor chest at each machine’s output so a slow station cannot stall the whole row. A single recipe bottleneck is easier to find with a production calculator than by rebuilding the line.
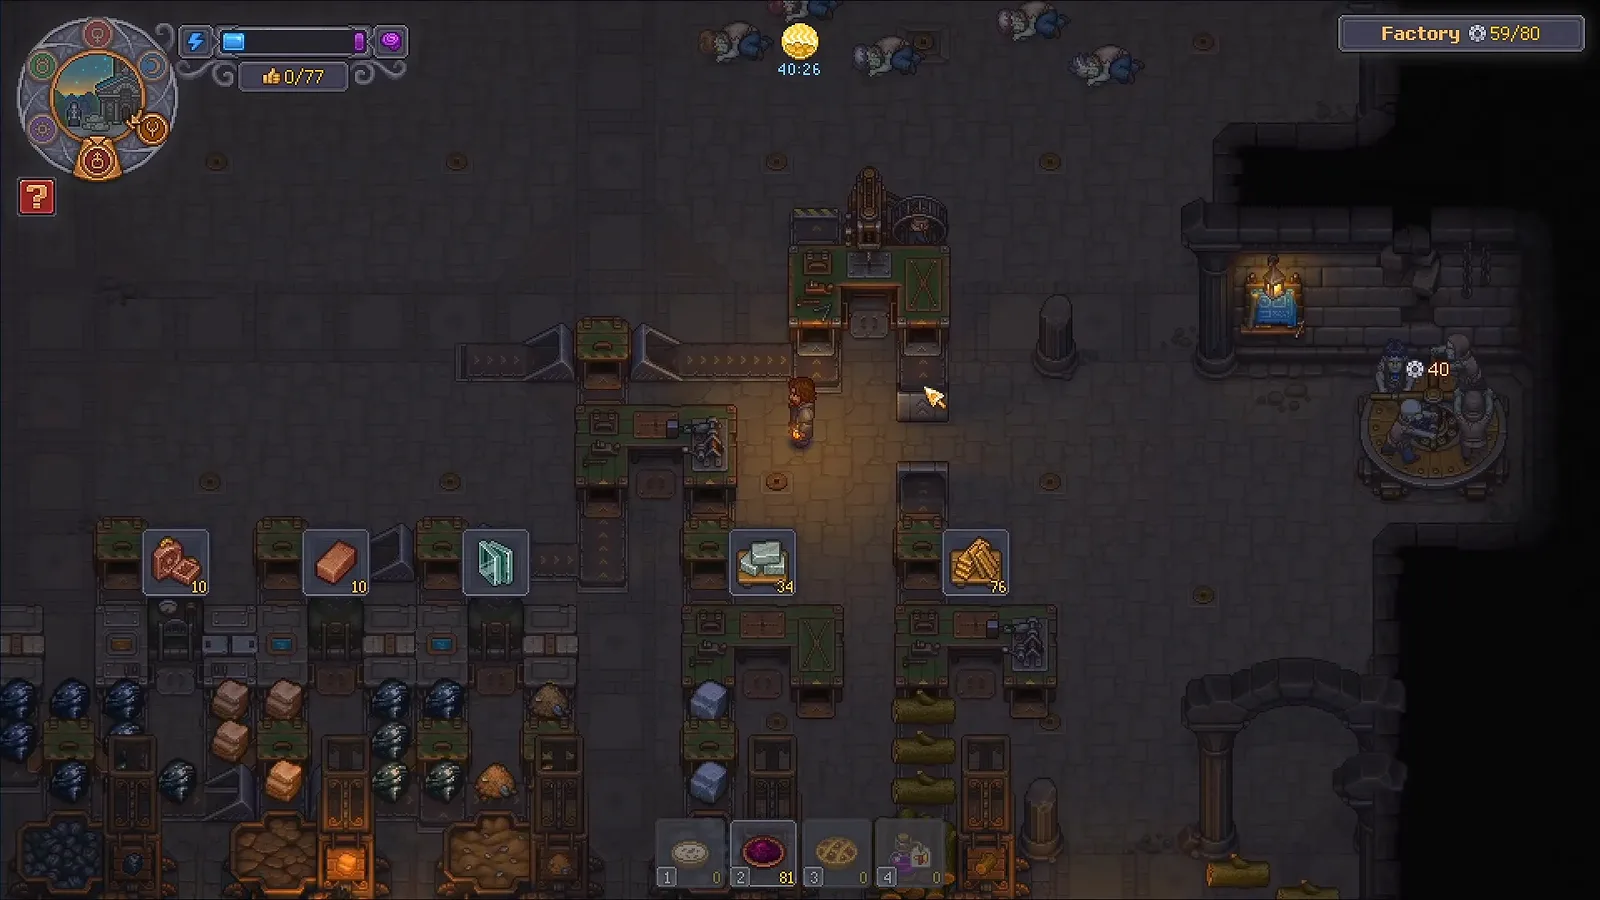
The junction in the middle is the pattern to reuse: belt in, chest out, machine beside both. Source frame: Sinxi at 5:50.
Place the kit stations along the loop
Factory benches — Assembly bench I/II/III, Smithy I/II and Kitchen I/II — must be conveyor-linked and staffed by a zombie, and the worker still needs the station’s mastery and the right tool. Within those rules, the kit layout is a chain of themed groups rather than one long line:
- Wood and stone kits. An Assembly bench I with the Auto-hammer extension turns logs into wooden kits directly; the stone machine follows the same shape, with the machine’s own output belt feeding a chest and then a belt upward.
- Glass and bricks. Two smithies stand in a straight line on the sand-and-clay side, each with a chest on its output and an underground belt carrying the results away.
- Iron and marble. A Smithy I takes iron plus coal, and an Assembly bench II takes marble; the walkthrough deliberately leaves empty floor beside them for future steel work.
- Clay molds and sculpture kits. A Smithy II handles clay molds and an Assembly bench III handles sculpture kits, each with a conveyor chest at its output.
- Assembly on the right. An Assembly bench I with Auto-hammer and an Assembly bench II with a Drill press sit on the opposite side, so the two halves of the line meet in the middle.
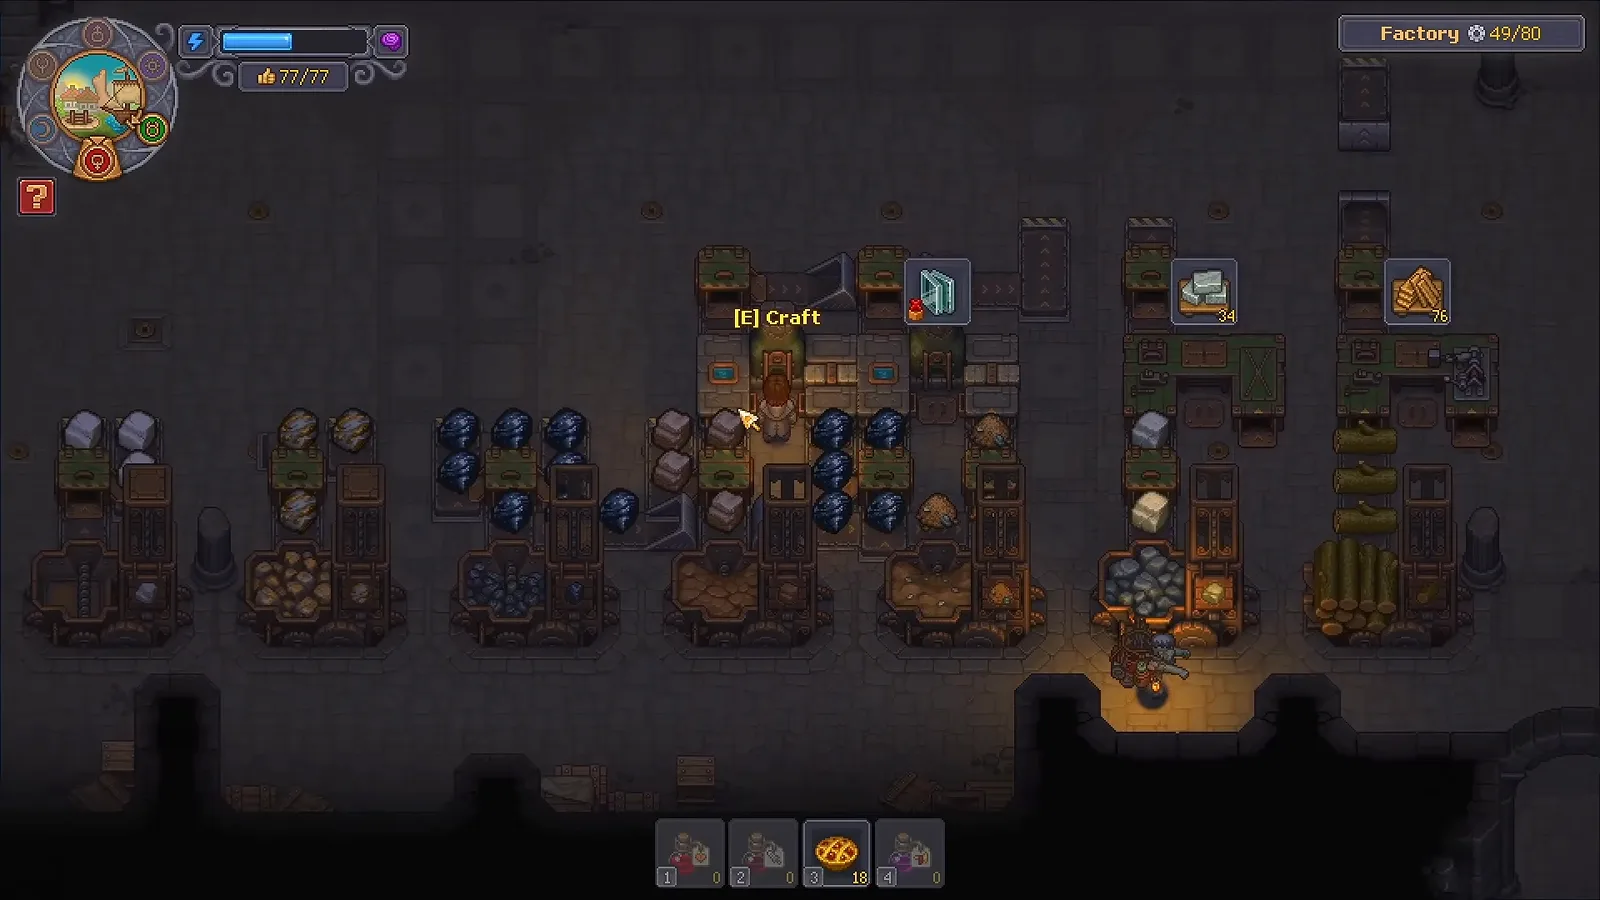
Finished items float above each station, which is the quickest visual check that a handoff is working. Source frame: Sinxi at 4:10.
Extensions are part of the layout budget: the Auto-hammer, Drill press, Spinning wheel, Sewing machine and Lathe are fitted to an existing bench instead of taking a new building, and the Factory board lists each one with its material cost next to the Assembly bench rows. The build board also carries the Factory power counter, so it is where you check both the extension cost and the power headroom before committing.
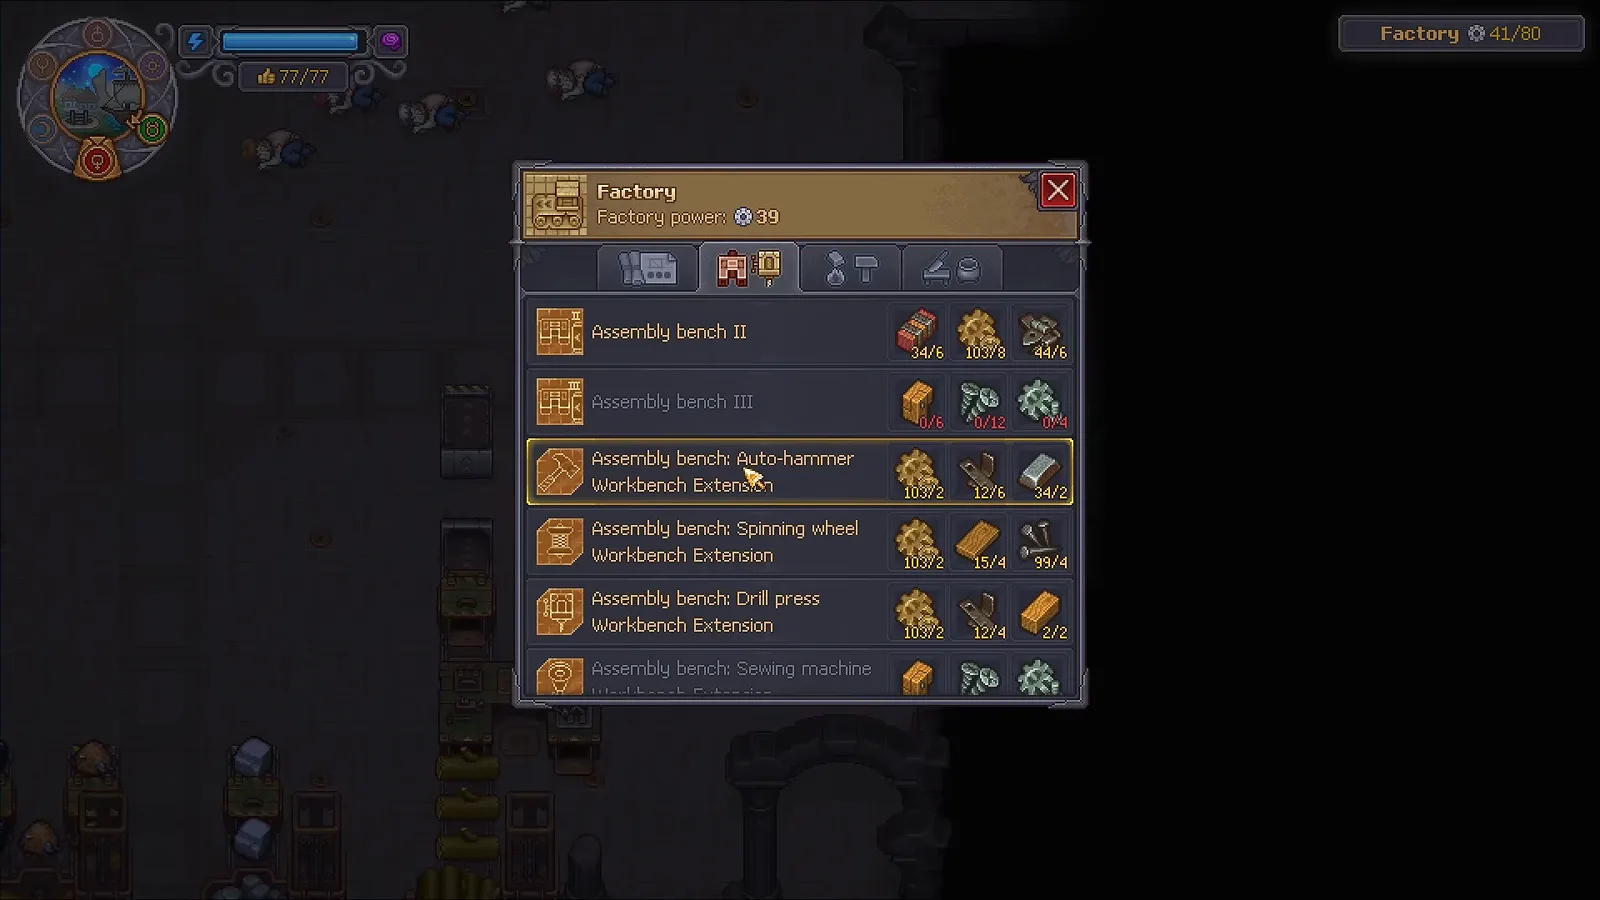
The Factory board is the layout ledger: power at the top, extensions and benches below. Source frame: Sinxi at 3:15.
For a numeric read on whether a station can keep up, run the group through the factory production calculator before you duplicate it.
Leave room for what you cannot automate
Two inputs cannot come off the belt network, so the layout has to accept them. In the kit walkthrough, special wood cannot be automated and has to be fetched from the special master crafter lumber mill, and steel cannot be made at all in vanilla Graveyard Keeper 2 — the site’s research confirms there is no ore-to-steel recipe and that ingots are bought from Bishop at the Royal Foundry. Sinxi handles both the same way: park a chest beside the machine and load it by hand.
That is also why he leaves floor space unused next to the iron and marble group. A machine that needs a hand-fed ingredient should sit near the entrance you walk in through, not in the middle of a finished chain. The Steel Ingot guide covers where the supply comes from, and the orders guide explains what the finished Supply goods are for.
One more layout habit from the same walkthrough: a station can change job without moving. The smithy set to glass can be switched to glass containers, the brick smithy can be switched to tableware, and once furniture kit demand is met the bench can be set to crates.
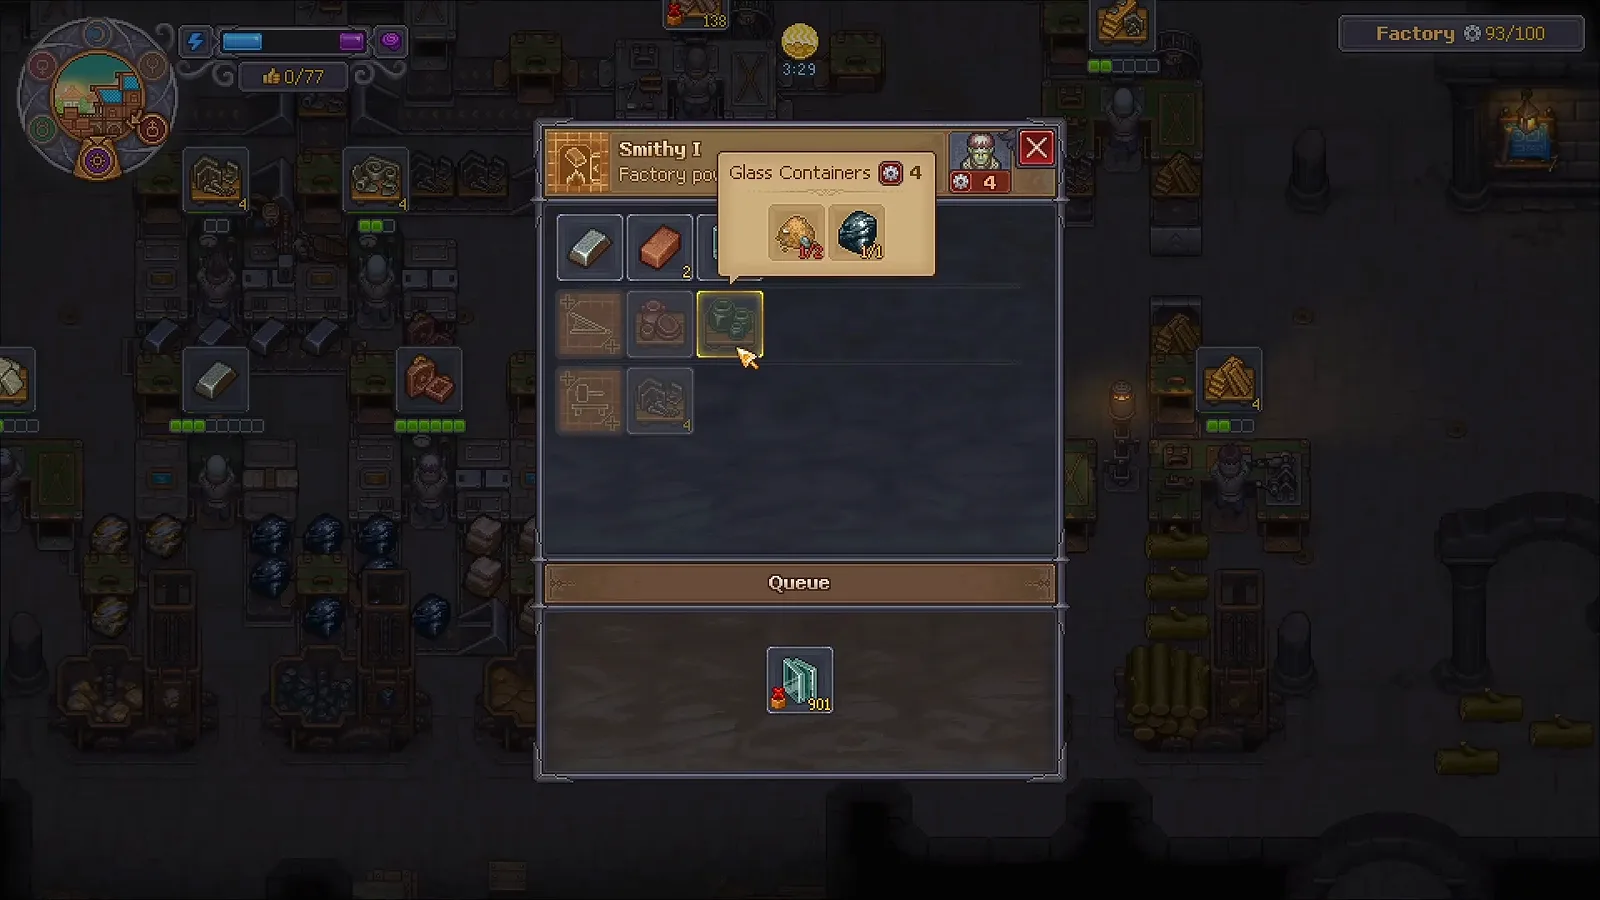
Changing the queued recipe is a layout decision too: one well-placed smithy can cover glass, glass containers and tableware without a rebuild. Source frame: Sinxi at 11:55.
Pre-flight checklist
Before you staff the line, walk it once and confirm:
- Each yard zone has its own storage cluster beside the stations that pull from it.
- Every Fuel-burning zone has a Firewood shed in the same area, since that shed feeds the whole area.
- The carousel is repaired, a zombie is assigned, and the Factory power counter has headroom.
- Every bench has a worker with the required mastery and tool.
- Resource provider exits lead into a chest and onward into the correct machine, with belt arrows pointing that way.
- Special wood and Steel Ingots have a hand-loaded chest near the machines that need them.
- Empty floor is reserved beside any future chain instead of being filled with decorative clutter.
- The cemetery plan respects the two-build limit per grave area type.
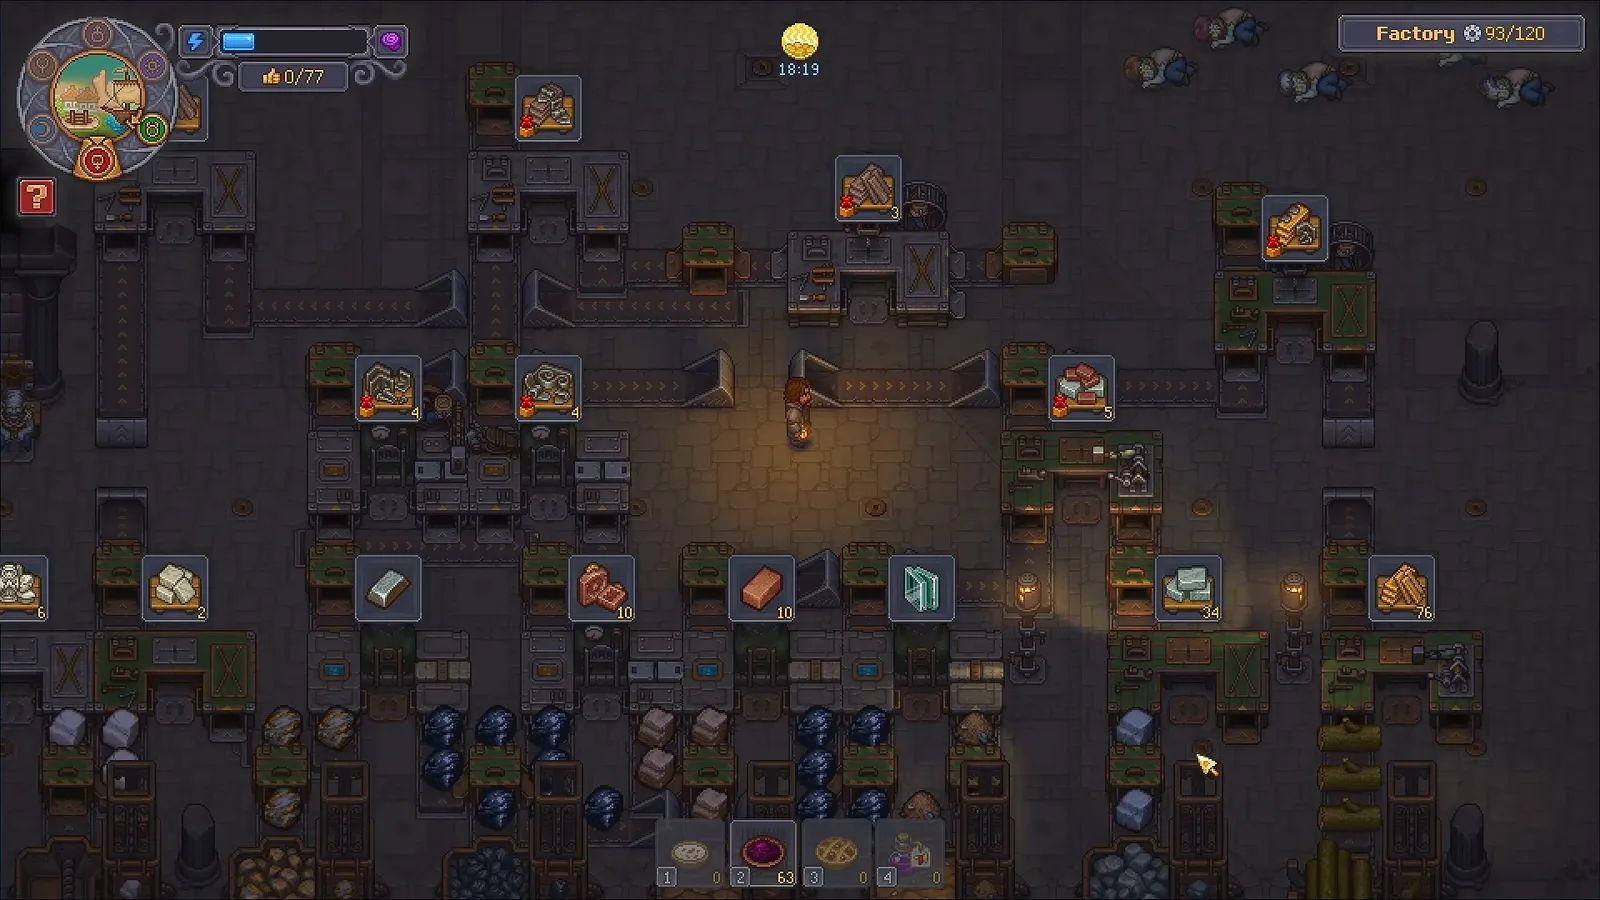
The finished loop runs end to end with every kit staged above its station; the Factory counter in the corner records how much of the plan is built. Source frame: Sinxi at 10:55.
The tech tree guide covers which technologies unlock the benches and extensions used above, and the automation guide covers the power and logistics systems in more detail. The alchemy guide explains the Study Table and Labo research loop, Dream Dust is the first blend that loop produces, and the gold guide covers coin income and the Golden Nugget line.
Sources and verification
The layout steps, screenshots and quirk notes in this guide were checked on 2026-10-06 against two independent English walkthroughs:
- Sinxi — “Optimized Factory Layout For All Tier 1 & 2 Restoration Kits in Graveyard Keeper 2” (13:00, about 105,000 views). The primary source for build order, belt routing and the kit station groups.
- Ic0n Gaming — “Complete FACTORY GUIDE For GRAVEYARD KEEPER 2 Tips” (14:54, about 50,000 views). Independently covers the powered bays, carousel staffing, provider exits, belt arrows and hand-feed limitations.
Mechanics that come from community research rather than in-game documentation — the two-build grave-area limit, the 7 factory power per carousel figure, and the same-area material pull order — match the site’s GK2 fact record and are labelled as community data where they appear. The article does not publish a reputation threshold for the factory unlock, because the checked walkthroughs explicitly say they did not measure it.
Related Articles
guides
Graveyard Keeper 2 Alchemy Guide: Runes, Labo and Folio
Graveyard Keeper 2 alchemy explained: study ingredients at the Study Table, match red, green and blue runes in the Labo, and craft Dream Dust and potions.
guides
Graveyard Keeper 2 Gold Guide — Fast Coin & Golden Nuggets
Graveyard Keeper 2 gold means two things: coin income and Golden Nuggets. Follow the water-to-paint sale and the sluice box route, checked frame by frame.
items
Graveyard Keeper 2 Dream Dust — How to Make It Step by Step
Dream Dust in Graveyard Keeper 2 takes 1 green rune and 1 blue rune at the Labo. Study Water and Blood at the Study Table, stock a flask, and mix it.
Was this helpful?
Thanks for the feedback!