Graveyard Keeper 2 Runes — Red, Green and Blue Values Explained
Graveyard Keeper 2 runes explained: study ingredients to reveal red, green and blue values, then match a Folio formula exactly. Full rune value table inside.
FAQ
How do you get runes in Graveyard Keeper 2?
Why will the Labo not accept my ingredient?
How many ingredients can you mix in the Labo?
Do rune totals have to be exact?
What are the rune values of common Graveyard Keeper 2 ingredients?
What are runes in Graveyard Keeper 2?
Runes are the currency of alchemy. Every alchemy ingredient carries a hidden value in red, green and blue, and the Labo — the in-game Laboratory I panel — only crafts when the rune totals of your ingredients equal a formula exactly. Nothing about the item’s name matters: an ingredient is worth its runes and nothing else.
Three rune colours, one rule. Study reveals the values, the Folio stores the formulas you discover, and the Labo enforces the arithmetic. This page is the reference for the rune side: what the values are, how to reveal them, and which formulas need what.
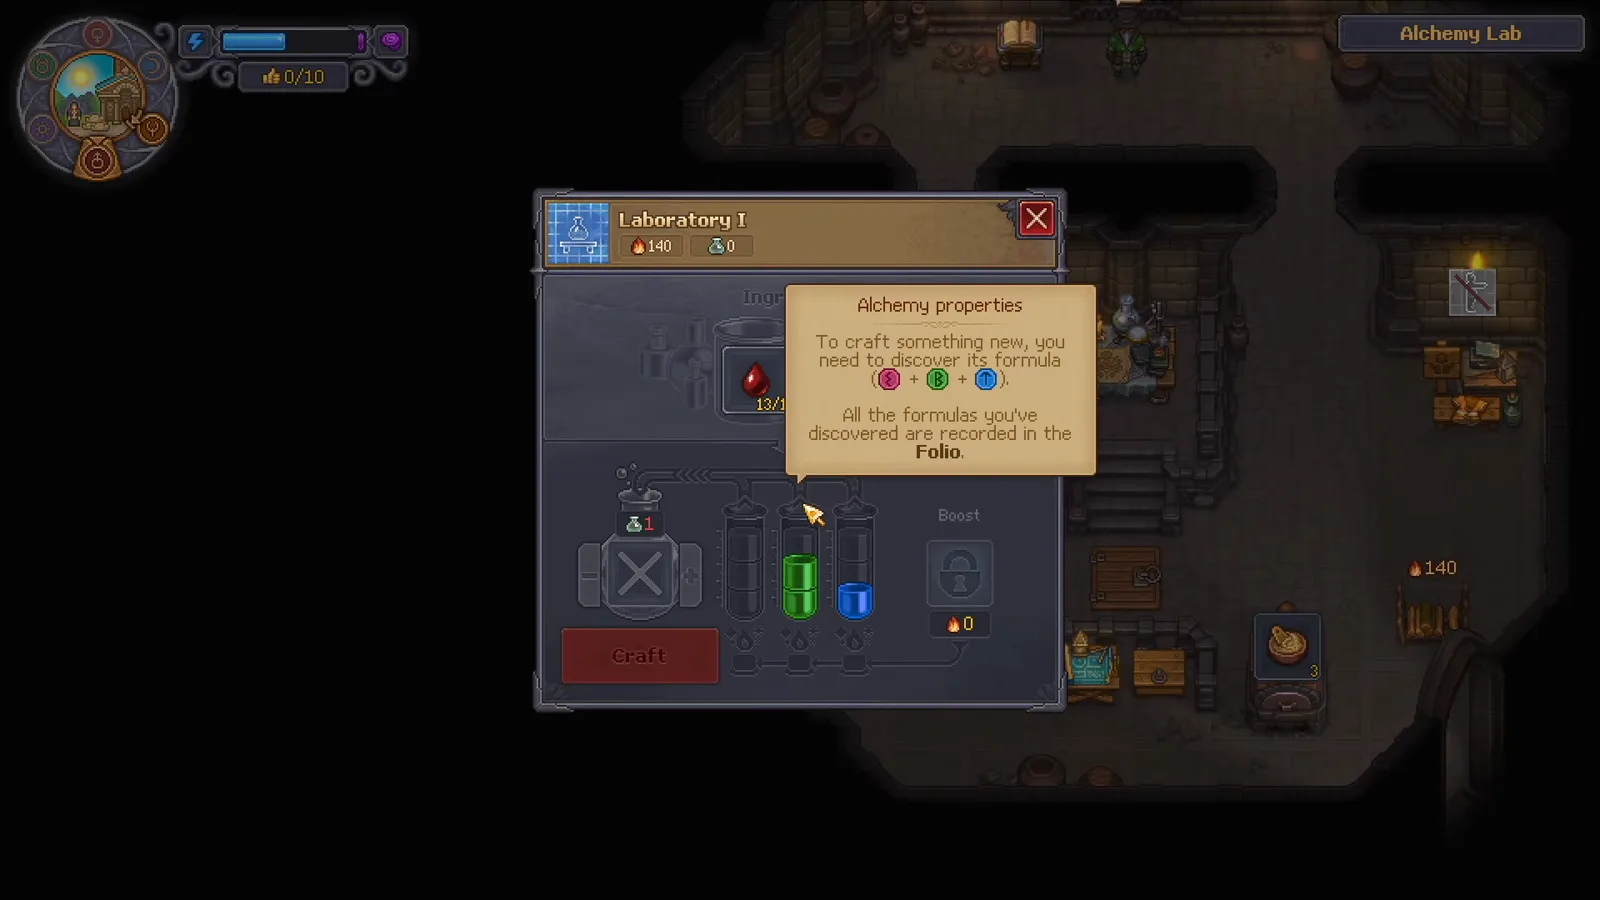
The panel tooltip states the loop outright: formulas are discovered and kept in the Folio. Source frame: Recreational Suffering at 2:25.
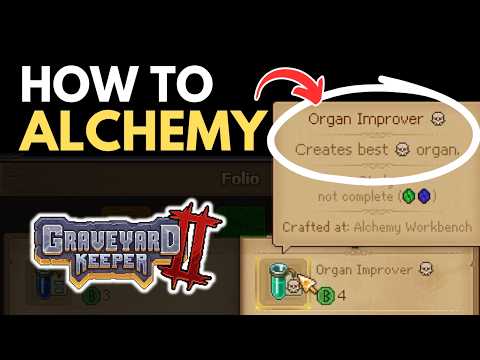
How Alchemy Works in Graveyard Keeper 2 — Recreational Suffering
How to reveal an ingredient’s runes
Runes are not visible when you pick an item up. An unresearched ingredient shows Runes: ??? and Study: not complete in its tooltip, and the Labo refuses to take it.
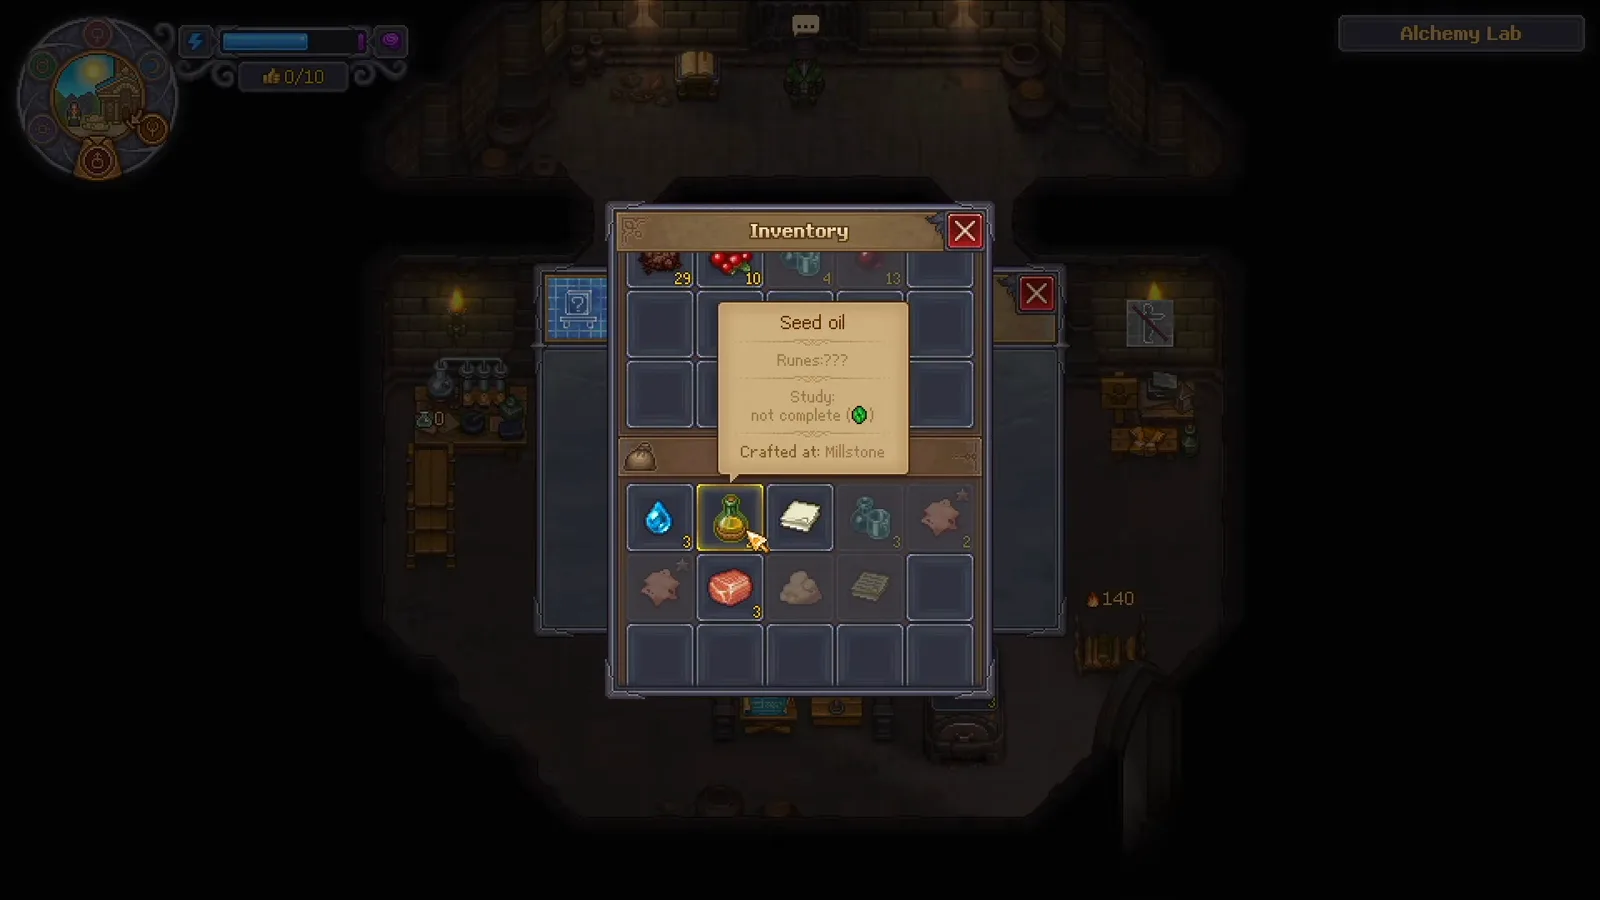
Before research, the tooltip hides the value entirely. Source frame: Recreational Suffering at 0:24.
To reveal it, put the item on the Study Table in the Alchemy Lab. Research costs 1 Faith and 1 Science per ingredient and then needs a work action to complete. Science is not bought with gold — the Study Table’s own tooltip says to get more by studying and decomposing items that contain the science marker, Paper and Science Kits named as examples, and Science Kits come from the Writing Desk chain.
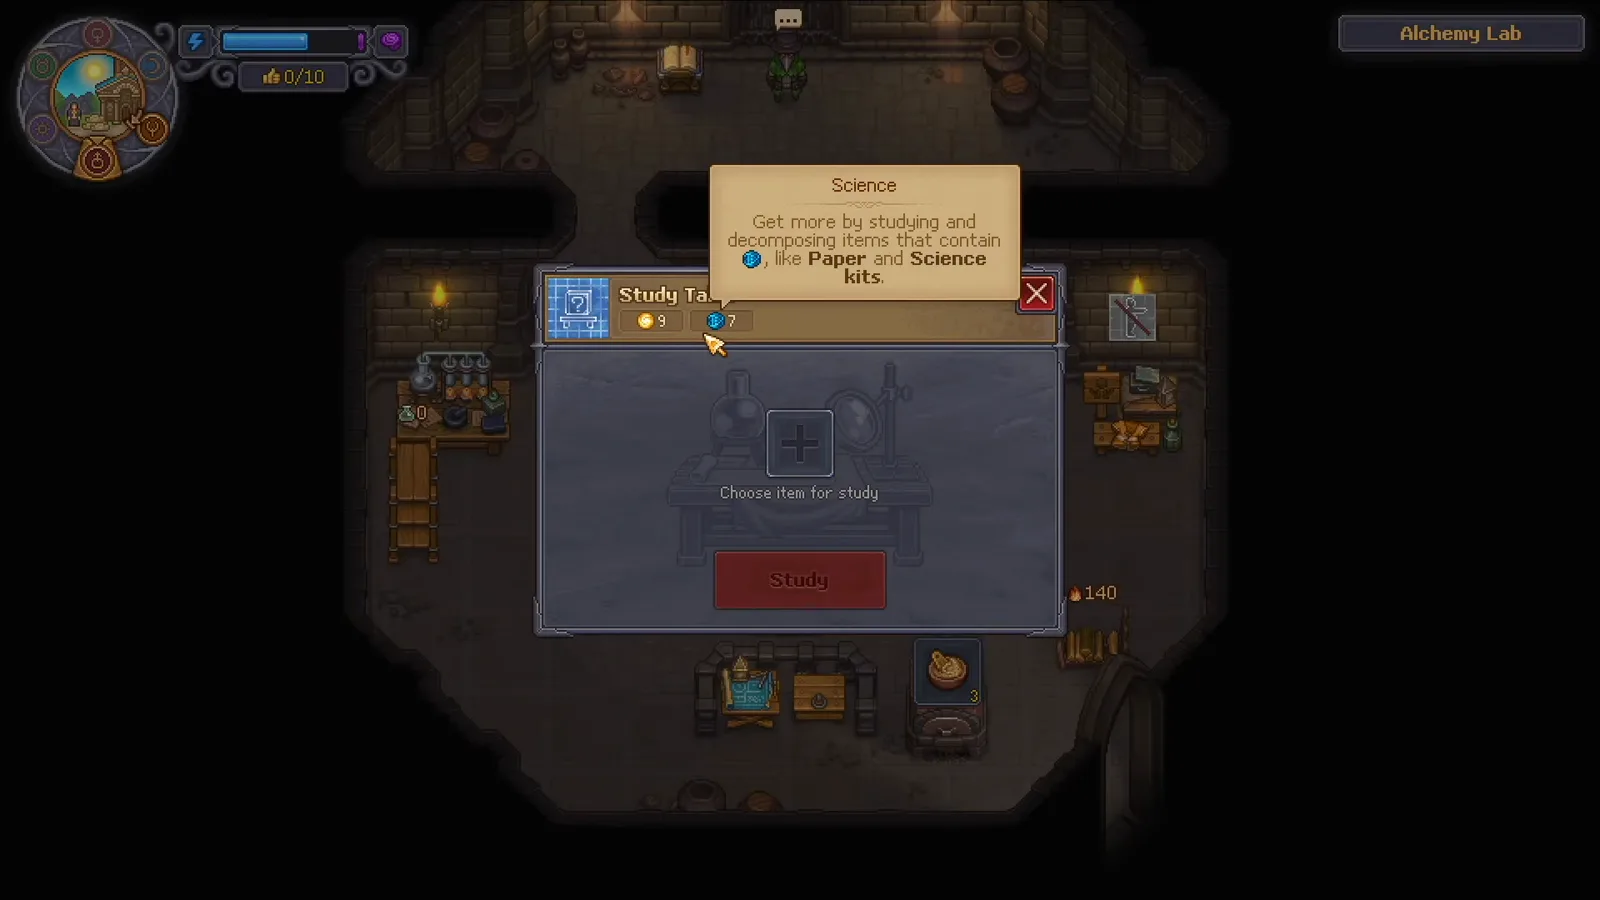
Science is the study currency, not gold. Source frame: Recreational Suffering at 0:04.
When a study finishes, the completion popup names the item and prints its Compound. That popup is the only place the game states a value plainly, which makes it worth reading carefully rather than clicking through.
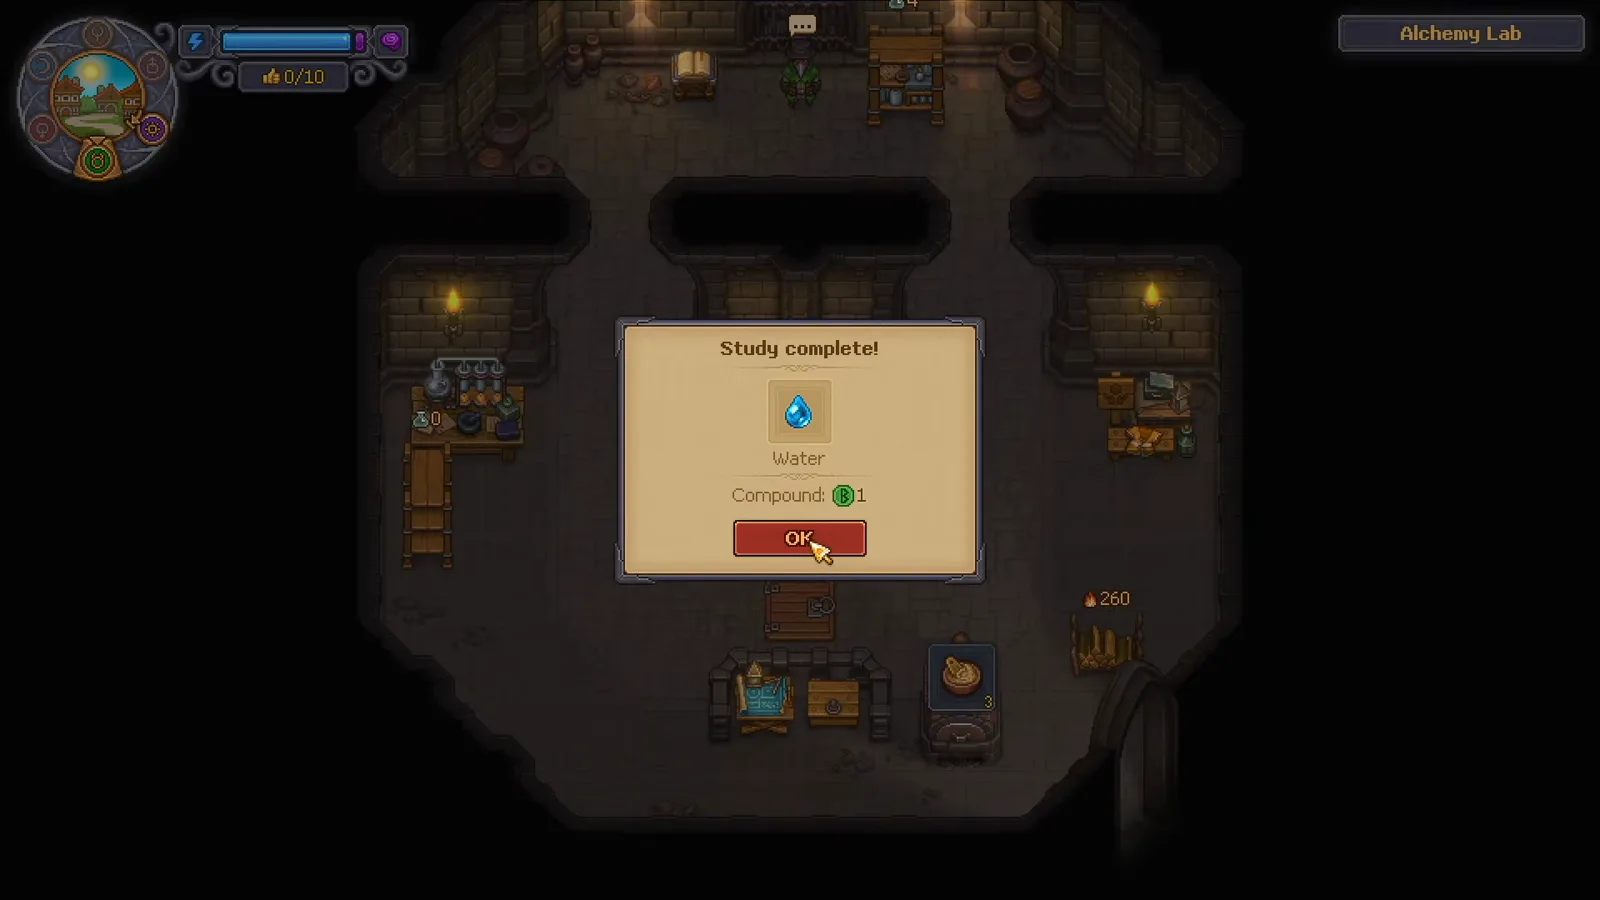
Water completes at Compound: 1 green. Source frame: Recreational Suffering at 0:52.
Rune value table
The table below separates values seen on screen in the checked walkthroughs from values recorded only in community data mining. Treat the second group as a working reference: ask the Study Table in your own save before you build a plan on it.
| Ingredient | Runes | Evidence |
|---|---|---|
| Water | 1 green | Verified — Study popup on screen |
| Blood | 1 blue | Verified — Study popup on screen, and repeated in a second walkthrough |
| Stone | 2 red | Single source — study popup, pre-release demo footage |
| Leaf, Stick, Berry | 1 of one colour | Community data (multi-site consistent) |
| Red Mushroom, Flour, Swamp mushroom, Night flower, Minced Meat | 2 of one colour | Community data (multi-site consistent) |
| Flax, Tooth | 1 red + 1 green | Community data (multi-site consistent) |
| Ash | 1 green + 1 blue | Community data (multi-site consistent) |
| Beeswax | 1 red + 2 green | Community data (multi-site consistent) |
| Clay, Sand | 1 red | Community data; recorded as interchangeable in every formula |
Two consequences follow from the table. First, Flax is not a single-rune ingredient — at 1 red plus 1 green it will leave a red rune in any mix you were treating as green-only, which is why the Flax guide places it in the Fabric and Paper lines instead. Second, the 1-for-1 and 2-for-1 items are what make small formulas cheap: two single-rune ingredients can hit a two-rune target without any juggling.
Alchemic Powder is the exception worth knowing. It is recorded as known from the start rather than studied, and it adds runes by name — useful when you need one specific colour and do not want to spend research on a new ingredient.
The exact-match rule
Rune totals must equal the formula. They cannot exceed it. The checked footage shows a two-green plus one-blue mix being rejected outright, and the same warning sits on the Dream Dust page: two green ingredients do not add up to a pass at value 2, they simply fail.
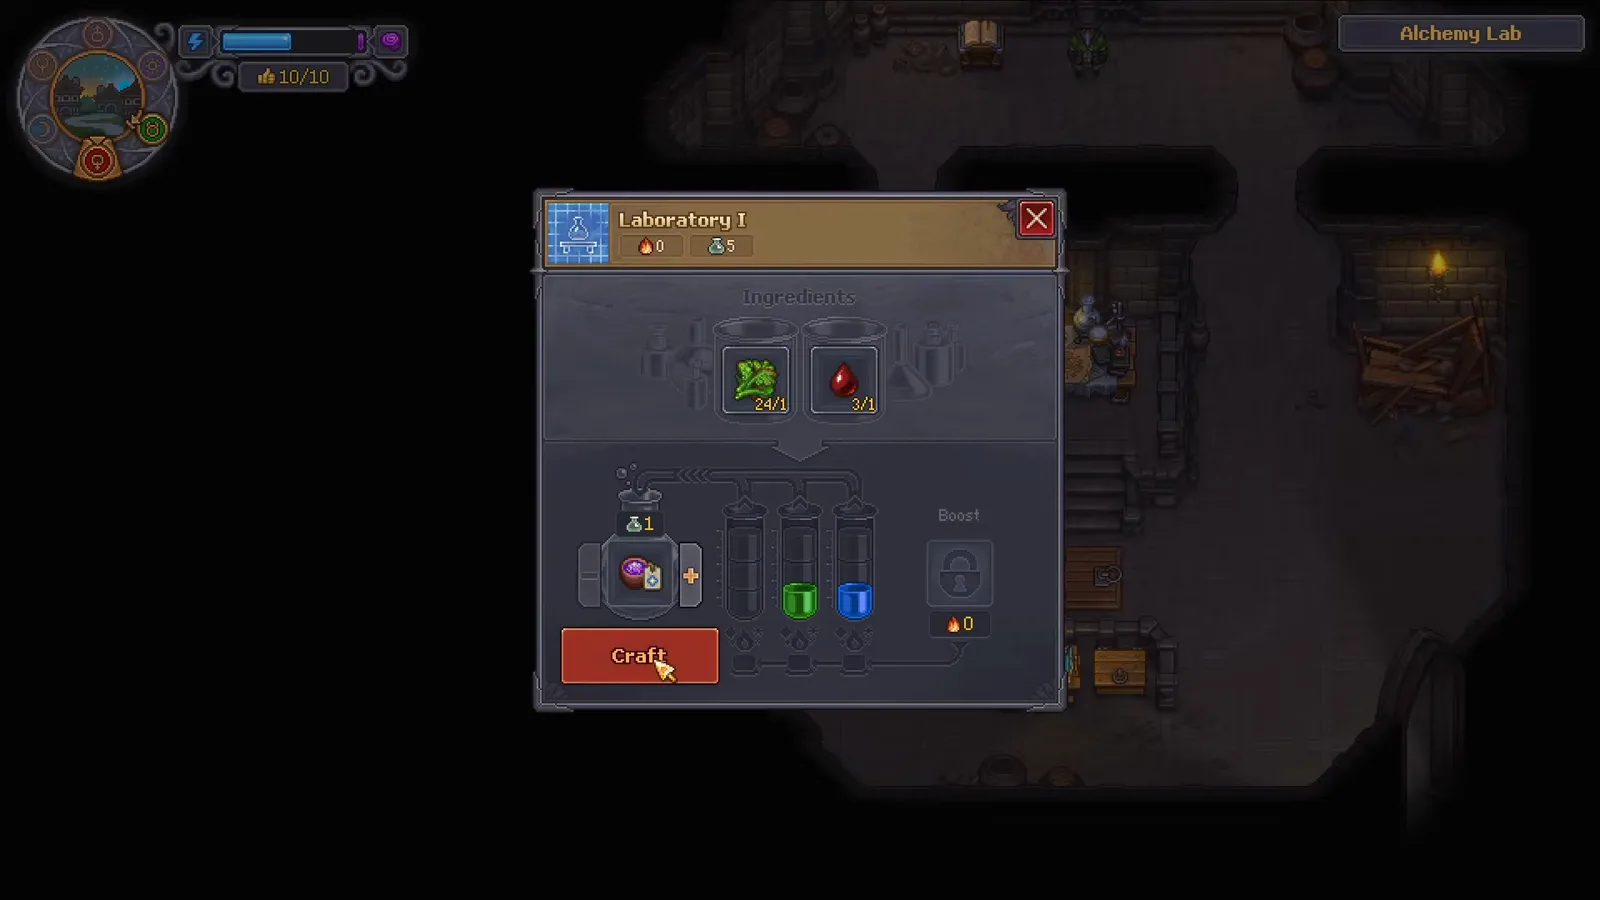
Read the rune lamps, not the ingredient list — they show the total before you commit. Source frame: Recreational Suffering at 1:24.
Slot count is the other half of the rule. Laboratory I holds two ingredients; Laboratory II holds three. No amount of ingredient shuffling changes that, so a formula needing three separate colours is simply not craftable in the first lab.
| Formula | Runes | Lab |
|---|---|---|
| Healing Potion | 2 red | Lab I |
| Damage Potion | 1 red + 1 green | Lab I |
| Zombie Motivator Potion | 1 red + 1 blue | Lab I |
| Dream Dust | 1 green + 1 blue | Lab I |
| Weak growth elixir | 1 red + 2 green | Lab I |
| Berserker | 1 red + 1 green + 1 blue | Lab II |
| Preservative | 3 green | Lab II |
| Lacquer | 2 blue | Lab II |
| Reanimation Liquid | 2 red + 1 green + 4 blue | Lab II |
| Philosopher Stone | 3 red + 3 green + 3 blue | Lab II |
Reading formulas in the Folio
Every formula you discover is written into the Folio, sorted by rune colour. Open it before you mix rather than guessing from memory — the rune badges on each entry are the authoritative cost for your save.
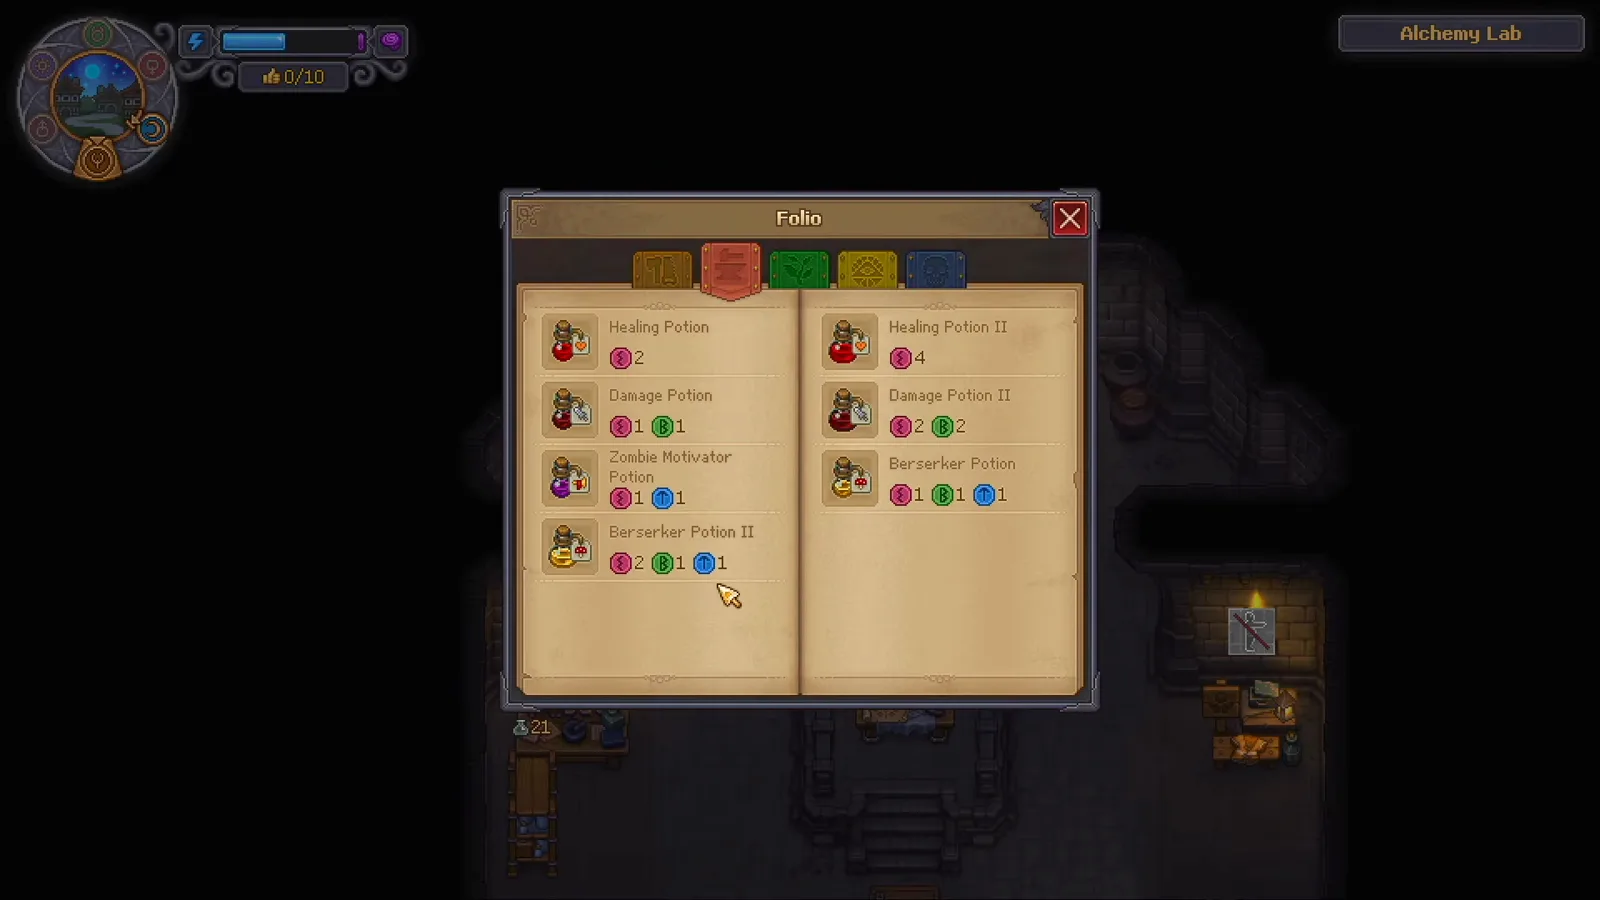
The Folio prints the exact rune cost per entry. Source frame: Recreational Suffering at 3:41.
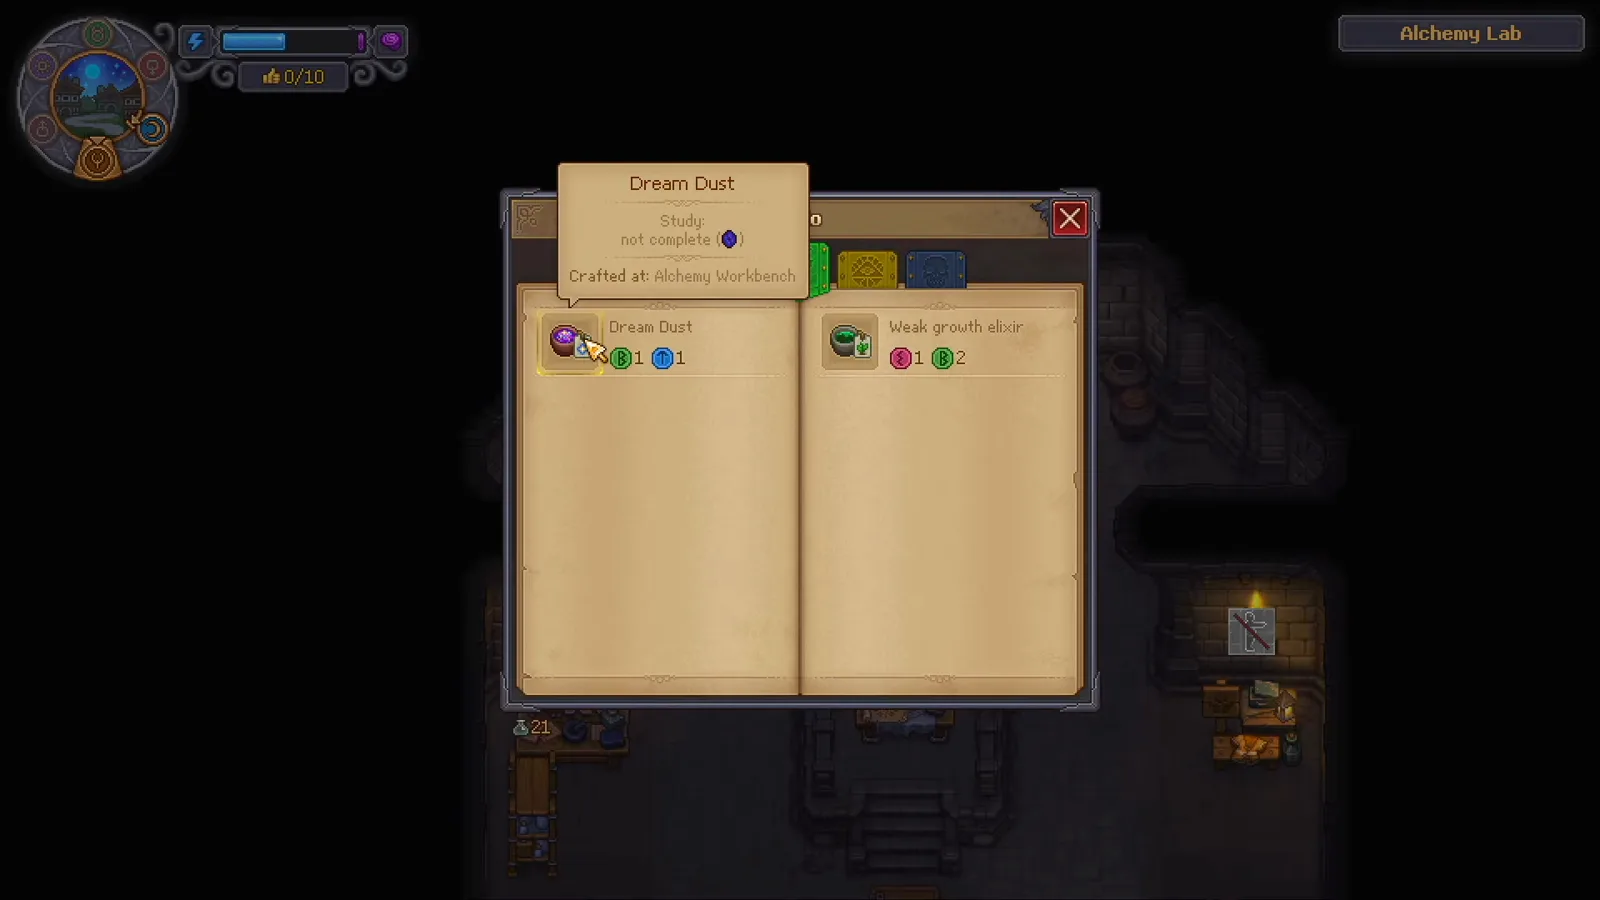
Two entries side by side: Dream Dust at 1 green + 1 blue, Weak growth elixir at 1 red + 2 green. Source frame: Recreational Suffering at 3:51.
Two potion tiers show up repeatedly in the footage and in community data, and they do not line up cleanly. The demo Folio records Healing Potion II at 4 red; patch 1.007 community data records Healing Potion III at 5 red. Those are two different saves and two different naming conventions, so this page keeps them separate rather than pretending they are the same entry. Your own Folio decides.
Where runes actually get spent
Runes matter because three of the game’s bigger systems are gated behind them:
- Zombies. Every body needs one Reanimation Liquid, recorded at 2 red / 1 green / 4 blue — a Laboratory II craft, so zombie production is locked behind the second lab. The how to make zombies guide walks the full chain.
- Money. Gold transmutation runs on Philosopher Stone at 3 of each colour. The how to make gold guide compares that route against selling ore and Town Warehouse orders, and the Gold item page covers the finished metal.
- Fertiliser and incense. Dream Dust at 1 green plus 1 blue feeds Crop Boosting Fertilizer I. Its own page covers the ingredients and the flask shelf.
For planning, the production calculator costs the individual crafts — Dream Dust, flasks, Science Kits — while the factory production calculator handles throughput once zombies are hauling. The alchemy guide covers the unlock chain and the Study Table loop in full; this page assumes you already have the lab open. If the Study Table, Flask Shelf and Labo are ending up as three separate trips, the layout guide covers station clustering, and the tech tree guide explains which mastery nodes gate the stations themselves.
Rune checklist
- Study an ingredient before you try to mix it —
Runes: ???means the Labo will refuse it. - Budget 1 Faith + 1 Science per ingredient, and remember some items carry no runes.
- Write down values from the Study popup; the game will not repeat them later.
- Match the total exactly, and check the slot count: two ingredients at Lab I, three at Lab II.
- Open the Folio for the formula rather than trusting a guide — including this one — when your save disagrees.
Sources and verification
Every screenshot here is a timestamped frame from an independent English walkthrough, checked on 2026-10-09:
- Recreational Suffering’s alchemy walkthrough — the Study Table tooltip, the unstudied-item tooltip, the Laboratory I alchemy-properties panel and the Folio recipe pages.
- Sinxi’s alchemy walkthrough — an independent pass over the same research loop, the flask shelf and the rune-total rejection.
- Recreational Suffering’s Sweet Dreams walkthrough — the Study completion popups that reveal Water as 1 green and Blood as 1 blue.
The rune values marked verified come from those on-screen popups and panels. Values marked community are multi-site data-mined figures for patch 1.007 that were not visible in the checked footage — they are recorded here as a reference, not as confirmed numbers. The primary walkthrough was recorded before the 22 September 2026 release, so its numbers are demo values; the folio in your own save is the authority, and rune values are exactly the kind of data a balance patch can move. The Folio also lists an Organ Improver entry carrying four green runes, and the footage offers no confirmed use for it, so this page does not plan around it.
Related Articles
guides
Graveyard Keeper 2 Alchemy Guide: Runes, Labo and Folio
Graveyard Keeper 2 alchemy explained: study ingredients at the Study Table, match red, green and blue runes in the Labo, and craft Dream Dust and potions.
guides
Graveyard Keeper 2 Gold Guide — Fast Coin & Golden Nuggets
Graveyard Keeper 2 gold means two things: coin income and Golden Nuggets. Follow the water-to-paint sale and the sluice box route, checked frame by frame.
guides
Graveyard Keeper 2 Layout Guide — Yard Zones & Factory Lines
Plan a Graveyard Keeper 2 layout that works: zone same-area storage, respect the two-build grave limits, power the factory, then route belts tile by tile.
Was this helpful?
Thanks for the feedback!